
One of our favorite sayings here at Joyride is: “Coffee is consumed in three principal places – at home, in cafes and in the office – and before Joyride, you could only get good coffee in two of those places.”
There are, however, many other places people would like to consume good coffee. And as an Eagle Scout and avid backpacker, I know just how incredible a great cup of coffee can feel out on the trail. So the question is, how do you brew the highest quality camping coffee without your typical kit, or when running to your nearest cafe just isn’t an option?
You have to balance the need for good coffee with the weight of any potential equipment, as well as the weight of any waste that brew method may produce. I’ve found three methods for camping coffee brewing that not only yield a outstanding cup, but are well suited for the trail too – small, lightweight and easy to use.
Camping Coffee: The Best of the Best
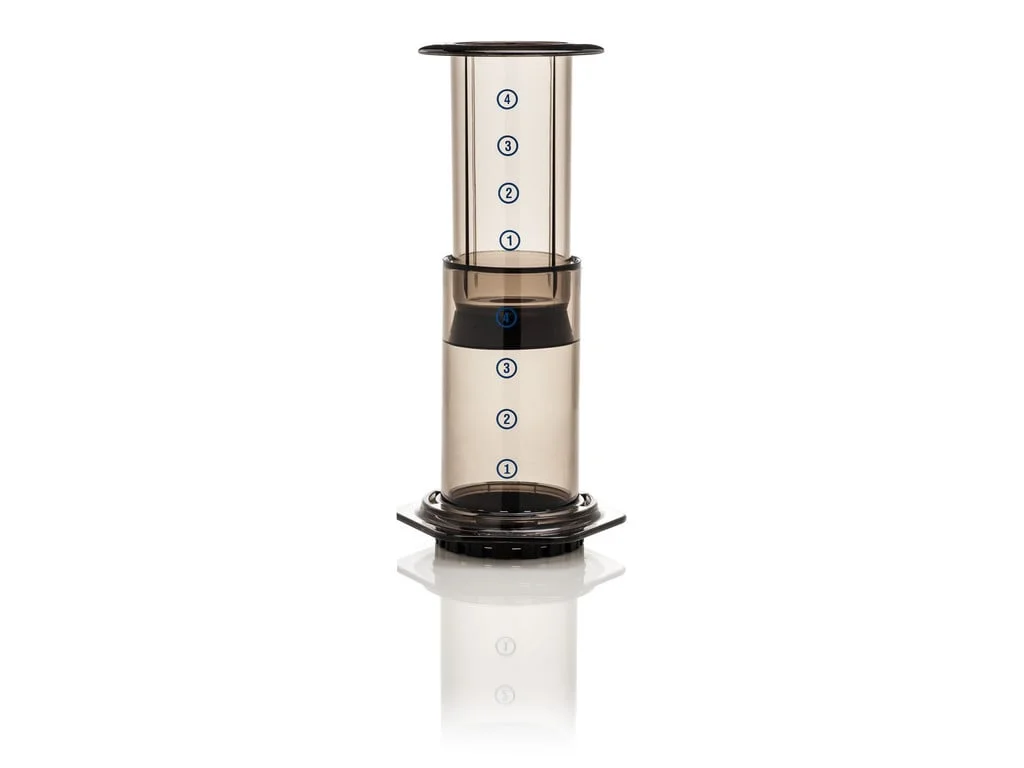
Aeropress
Pros: The principal benefit of the Aeropress is that in its entirety, including a week’s supply of filters, it weighs only 231g. It also requires very little water, which saves on fuel needed to heat the water, and only uses approximately 17g of coffee per brew, which means you have to pack fewer beans. Additionally, cleaning is quite easy compared to other cloth or mesh filter brewing options, and the only waste is approximately 20g of biodegradable coffee grinds and a small circle of damp filter paper.
Cons: The one big downside of the Aeropress is that it is very much a single use gadget – it really doesn’t have any other application, which could make it a frivolous addition to your backpacking setup.
For a week on the trail, at two cups a day, this setup would weigh 231g for the gear and 238g for the coffee.

Snow Peak Titanium French Press
There are quite a number of camping french presses, but my favorite is the Snow Peak Titanium French Press.
Pros: Not only does the entire brewer weigh only 198g, but the brew vessel itself can be used as a mug. The wire mesh plunger disassembles for easy cleaning, and, unlike paper filter brewers, can be used again and again. It can hold up to 24 oz of liquid, which means enough coffee for two people at once – or one gluttonously large serving, if that’s your style. As an added bonus, the mug has measurements on the side – which can be extra helpful if you ever need to use it as a cooking vessel (score another point for the french press!).
Cons: The downside of the french press is that it requires more coffee than other methods, such as the Aeropress – each 16oz brew needs 27-30g of coffee. Another issue with this brew method is that after brewing you need to decant the coffee, which means having at least one other mug handy and an additional item to clean.
For a week on the trail, at two cups a day, this setup would weigh 198g for the gear and 210g for coffee.

Hario V60 Pour Over
Although there are also many “camping” pourovers, the winner in my opinion is the trusty plastic V60 from Hario. One of the brewers that markets itself as a backpacking pour over is the GSI Collapsible Java Drip, which packs flat, yet weighs a surprising 135g compared to the V60 which is the lightest brewer by far – weighing in at a featherweight 83 g.
Pros: For a week supply, assuming two brews a day, you would only need 24g worth of filters, and 294g of coffee, also you would get 20oz of coffee a day rather than the 16oz on the french press and even less on the Aeropress. The V60 is also incredibly easy to clean and can brew directly into a mug, making cleanup perhaps the easiest of all the above brew methods. Also, if done correctly, the V60 produces one of my favorite cups of coffee at home. The ability to have the same quality on the trail makes it hard to beat.
Cons: One downside of the V60 is that, unless you have a kettle or spouted pot, getting an even extraction can be hard. It's tough to properly bloom your grinds if you can't control the amount or stream of hot water. Additionally, if you are truly practicing leave no trace camping, you would need to pack out the used filters – which retain not only a large quantity of wet grinds, but also the larger paper filter.
For a week on the trail, at two cups a day, this setup would weigh 107g for the gear and 294g for coffee.
To Grind, or Not to Grind?

While coffee is always better when freshly ground, I question the weight-to-quality ratio of a grinder. Additionally, grinders don't work so well when wet. So unless you are painstakingly repacking it in waterproof bags you will inevitably end up with a damp grinder, resulting in gross, damp grounds.
If you just have to have a hand grinder out on the trail, there are two that fit the bill. The first is the Porlex JP-30 Stainless Steel Coffee Grinder, which actually boasts a ceramic conical burr and yields a surprisingly consistent grind. Another option, marketed specifically as a camping grinder, is the GSI Outdoors JavaGRIND Coffee Grinder (not pictured). While I have not used it myself, it has a worryingly low Amazon rating, due to poor build quality and consistency.
Both of these grinders weigh 11.2 oz and thats really the deal breaker for me. I can’t imagine that the slight increase in quality is worth that much weight.
Other Camping Coffee Honorable Mentions

Cold Brew
Pros: Requires almost no additional equipment, exept for a cloth filter.
Cons: Requires the most grinds and fresh water, and the cloth filter can be a pain to clean.
Cowboy Coffee
Pros: Badass, no equipment, minimal effort.
Cons: Tastes gross.
And finally, the Camping Coffee Unmentionables:

InstantCoffee
Pros: Easy, no special equipment.
Cons: Not coffee – just eat a caffeine pill and save yourself from having to drink this stuff.
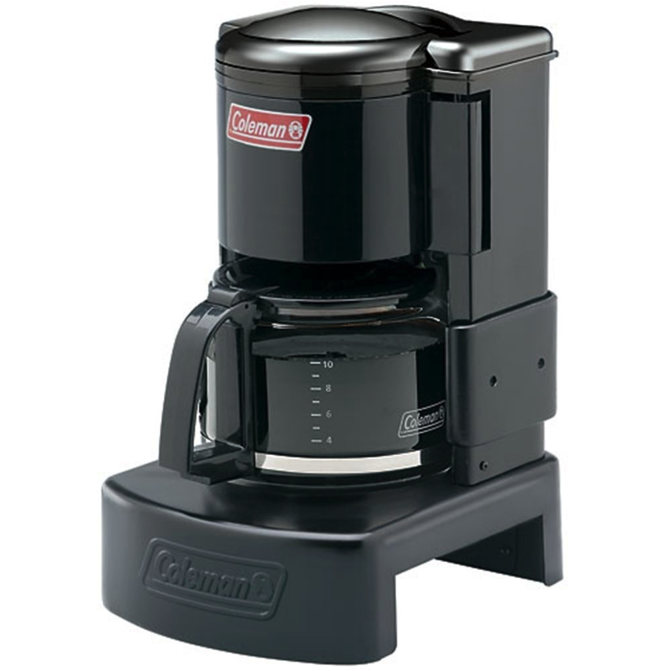
Coleman Camping Coffee Maker
Pros: Makes a full pot of coffee!
Cons: This is what’s wrong with America.
This blog post was written by Joyride co-founder Noah Belanich.